Been playing with the build up script again. Ran my f16 piece through it, comes out quite nice.
Archive for the 'svg' Category
This build up scripts addictive…
Published August 27, 2008 inkscape , svg 4 CommentsTags: svg buildup animation
Another one…
Published April 12, 2008 inkscape , svg , Uncategorized Leave a CommentTags: animation, buildup, inkscape, svg
Just did another one, off my Susan ward image.
Vector Build ups….
Published April 12, 2008 inkscape , svg , Uncategorized Leave a CommentTags: animation, buildup, inkscape, svg
So Ed Halley wrote this python script that creates an animation from an SVG file by building the image up shape by shape and doing nice tracking between them and so on. After he showed off his first anim in the jabber/irc room and posted the link to the script I couldnt resist having a play. Took a few tweaks to make the script play nice with win, but once thats done it was just a matter of setting it going and waiting while inkscape rendered a few thousand frames.
The first attempt i did shows that my style of drawing makes for a fairly random video. Since the animation is being done from the z-order info and my images are done in a pretty loose manner, the end result jumps about quite a lot rather than being a particularly ordered like eds, but its still kinda cool to watch them appear from the blank page. Decided I’d play with a drawing with slightly less objects while I improved the technique, so picked my Ford shelby GR-1 image. Got the same sort of slightly random video, so I tidied it up a bit before I ran it again by grouping objects from each area so the vid focuses on one region at a time. Seems to work fairly well, just need to find some music for it.
links:
Eds vids:
Punk Angel build up: http://www.youtube.com/watch?v=5lrnreVi3fg&NR=1
Naginata Onna build up: http://www.youtube.com/watch?v=fNTeoHeGMQY
Lamborgini build up: http://www.youtube.com/watch?v=4wl6hXurUaI
Stock Patterns
Published January 16, 2008 inkscape , svg , Uncategorized Leave a CommentTags: custom patterns, inkscape
I havent had all that much time to code on inkscape this last release, but one of the things I did get in there is stock pattern support. To get your patterns to work as stock ones theres a little more to it than just c/p to the patterns.svg file. Rob A has done a nice little tutorial that explains it pretty well:
http://ffaat.pointclark.net/blog/archives/143-Creating-and-Adding-Custom-Patterns-to-Inkscape.html
not xmas, but the when we announce the About Screen contest for the upcoming release of Inkscape (0.46).
If you like the idea of having your art as the about screen of an app with a install base in the hundreds of thousands, then get to work! (the 0.45.1 packages had >1mil downloads from sourceforge!)
The contest deadline is January 6th, 2008. As with the past few contests we’ve had, it is being done on DeviantART ( http://www.deviantart.com/ ).
You can find out more about it at:
http://inkscapers.deviantart.com/journal/16001755/
Additionally, if you have a DeviantART account, please show the news some “love” so we can hopefully get the story promoted to the front page.
http://news.deviantart.com/article/39226/
Good Luck! Have fun! Draw Freely.
I really love to see the kinds of things people are creating with Inkscape, so good to be providing a good tool to people that their doing cool stuff with.
Perfect example of the kind of cool things people are doing is mr.manders wip over at inkscapeforum.com :
Have been realising of late how many good inkscape tutorials there are out there that dont seem to be getting found by folks. So thought I’d list a few of them that y’all might not have come across.
In no particular order we have:
- HeathenX’s youtube video tutorials – Great collection of screencasts covering a variety of tricks.
- BittBoxx’s Vector Grunge tutorial – First tutorial on his site thats inkscape over illustrator, cos our tracings better 🙂 several of his others are easily doable in inkscape, and he has svg as an option on most of the downloads.
- Creating swirls in Inkscape by TentacleGuy on DA – Tutorial on deviant art about using the pattern on path extension to do fancy swirls. Look in his deviations, hes got some nice svg splatter brushes too.
- Variety of cool Inkscape tutorials by Ryan Lerch – Well worth checking out.
- Rubber Stamp Tutorial from Nicu – Personal favorite of several good tutorials by Nicu.
Hope theres something in there that you hadnt seen before. Let me know of any other gems you think I’m missing.
edit: one I missed Richard Querins Screencasts – Some nice screencasts showing various effects, main blogs a pretty good read too 🙂
Was playing earlier with SVN, and found a far easier solution to creating fills for closed shapes drawn with the calligraphic tool than I’d been using previously. Simple enough I should be able to do without pics, so here gos
- Draw the shape with the calligraphic tool
- Duplicate it. (ctrl + D)
- Draw another line in the region that will be filled.
- Select this line and the duplicate of the original.
- Do union (ctrl & + )
- break apart (ctrl + shift + K)
- Union again (ctrl & + )
- Send to back (End)
- Fill it with a whatever color you want.
Faking irregular gradients in inkscape
Published October 21, 2006 inkscape , svg , tutorial 7 CommentsThe question was asked in the jabber room if it was possible to make a gradient follow a path.
While strictly speaking its not, it is possible to fake it fairly well.
This is a very quick and dirty outline of how….
Step 1. Create your path.

Step 2. Duplicate it, and move it up a little (were creating a ‘thick’ version of it.)
Step 3. Connect the 2 curves – Duplicate the original again, Select both, do ctrl+K to make them into one path, then connect the nodes at either end so you have one shape.
Step 4. Repeat the first 3 stages, but move the second line to where you want the far end of your gradient.
put the relevant fills on the 2 shapes to be the start and end of the gradient, and remove the strokes.

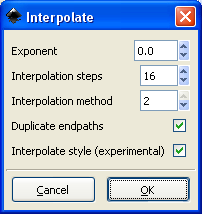
Step 5. Use the interpolate effect to blend between them. Use method 2 and turn on blending of styles. Make sure the thin ones on top of the thick one.

Step 6. And your done…. if you find you get messy edges like below, clip paths are a god send…
There have been a couple of discussions recently on the mail list about mirroring and tiled pattern creation etc where the features being requested were already possible using the tile clones feature. Thought I’d try to expand on how to do them a bit as it seems to be something people consider to be voodoo. (true to me to an extent, so much power in there)
Anyways, first up is doing a mirror modifier
1) create a new document and turn the grid on, i set it to 25 and turned on snap nodes, and always snap.
2) Create a rectangle that covers half the page. I’ve filled it green just to make it nice and visible.
3) draw a squiggle over the rectangle, and group it.
4) Open the tile clones dialog, select reflect, and do 1 row, 2 columns.
5) Select the clone thats over the original, and delete it. you should get a full page with the left mirrored to the right.
6) enter the original group, delete the squiggle. I left the stroke on the box, but removed the fill as it makes it clear what the centerline for the mirror is. Tis a good idea to save the doc as something useful like mirror.svg if your going to want to create mirrored objects regularly. just open up that as a template and skip the first steps.
7) Make sure your still in the group(double click or right click > enter group), and then draw on the left side, and it will be instantly reflected on the right. be warned, if you overlap the clone will have a higher z-order so wierdness can ensue.
8) last thing was to remove the stroke from the box, I also shoved it one pixel toward the center as there are occasional rendering artifacts that leave a seam on what should be pixel perfect joins.
Hope thats clear enough.
Sim


